Game Animation Combos: Mastering 3ds Max with Yun Kwon’s Workflow Hacks
🧐 The Frustration of Stiff Combos in Game Animation
There’s always that one animation sequence where the character’s movements feel disconnected, the hits lack impact, and the whole combo just falls flat. You follow the standard steps, but the result still looks off. Often, the culprits are subtle workflow issues and a misunderstanding of how physics and weight truly influence motion.
💡 Yun Kwon’s Top 3 Workflow Hacks for Killer Game Combos
1. Harnessing Inertia for Heavy Weapon Flow
Professional animators understand that heavy weapons don’t just stop on a dime. Inertia dictates their movement. When creating recovery poses after a strike, let the weapon’s momentum carry through its arc. For instance, after a powerful swing, allow the spine and weapon to continue their natural path for an extra few frames. This creates a more believable, fluid motion that avoids abrupt stops and jarring transitions, making even a simple swing feel weighty and impactful.
2. The ‘Freeze and Refine’ Technique for Precision
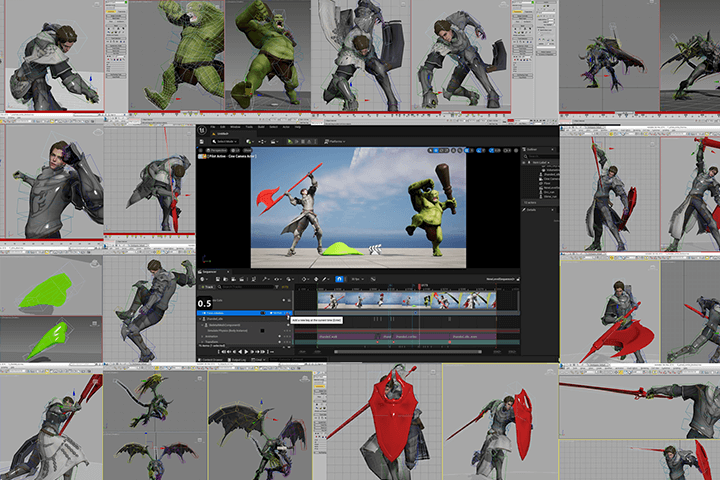
When blocking out complex motions like combo attacks, especially with two-handed weapons, it’s crucial to isolate elements. Before creating an anticipation pose for a new strike, freeze the weapon. This is easily done in 3ds Max by going to Properties and unchecking ‘Show Frozen In Gray’, then freezing the object. This allows you to manipulate the character’s body without the weapon jumping around, giving you a clean canvas to sculpt the perfect anticipation, hit, and recovery poses for each individual attack in the sequence.
3. The ‘Delayed Reaction’ for Dynamic Impact
A common pitfall is making reactions happen simultaneously with the action. For a more dynamic and grounded feel, implement delayed reactions. For example, when a slime monster hits the ground after a jump, the actual impact and subsequent squish shouldn’t happen at the exact frame the foot touches. Instead, delay the primary ‘squash’ or ‘grounded’ pose by about 2 frames using the arrow keys to nudge the keyframes. This subtle timing shift adds weight and makes the animation feel more responsive and alive, mimicking how real-world physics would play out.
🛠️ Key Skills & Details That Define Professional Quality
To elevate your game animation, focus on translating the principles of physics into tangible movement.
- Weight and Momentum: For heavy weapons, always consider inertia. The recovery pose isn’t just a stop; it’s a continuation of the swing’s momentum, with the character’s body following suit. This means letting the spine and weapon continue their arc, creating a more natural flow.
- Timing is Everything: Don’t let actions and reactions happen on the same frame. A common pro trick for creating a sense of impact, like a slime hitting the ground, is to delay the main “squashed” pose by a couple of frames after the initial contact. This separation makes the impact feel more substantial.
- Staging and Silhouette: Pay close attention to the silhouette of your animation, especially during powerful moves. Ensure the character’s form is clear and readable from different angles. For a sword slash, for instance, the arc of the weapon and the turn of the spine should create a strong, distinct shape.
- Subtle Deformations: When animating amorphous creatures like slimes, the “jelly-like” feel comes from controlled deformation. As the creature stretches forward, its width must decrease to conserve volume. Similarly, when it squashes, its height reduces. This adherence to the law of conservation of mass is key to selling the liquid motion.
- Strategic Keyframing: Blocking out key poses is essential, but don’t neglect the ‘in-betweens’. For complex rotations or fast movements, use sliding keys to ensure smooth transitions and remove abrupt changes. When polishing, adding subtle keyframes to refine trajectories and smooth out awkward spins can make a huge difference.
💬 Frequently Asked Questions
Q. As a 3D Animator, how can I make my character’s movements look less stiff when animating two-handed weapon attacks?
A. Focus on the concept of inertia. Instead of abrupt stops, allow the weapon and character’s body to continue their momentum through the recovery poses. For instance, after a strong swing, let the weapon and spine follow their natural arc for a few extra frames. This creates a much more fluid and believable sense of weight.
Q. What’s a practical workflow tip for blocking out complex animation sequences, like combo attacks, in 3ds Max?
A. A highly effective technique is to freeze specific elements, like weapons, before posing the character. In 3ds Max, you can freeze an object and then uncheck ‘Show Frozen In Gray’ in its properties. This prevents the frozen object from interfering with your body posing, allowing you to meticulously craft each anticipation, hit, and recovery pose without distraction.
Q. How can a 3D Animator make a creature like a slime feel more ‘alive’ and less rigid during movement?
A. The key is to apply principles of physics and material properties. As the slime moves, ensure its volume remains consistent: when it stretches, it must narrow; when it compresses, it must widen. Additionally, introduce subtle, delayed reactions to impacts and add slight, asymmetrical rotations to the bones. Pushing rotation keyframes back by about 2 frames for different bones can create a more organic, crawling motion.