Blender Cel-Shading: Mastering the Hand-Drawn Look with Rigging
🧐 The Rigging Hurdle in Cel-Shaded Animation
 Getting that perfect, fluid hand-drawn animation feel in 3D can be a real challenge. Often, the issue lies not in the modeling or texturing, but in how the character’s rig is set up. You follow the steps, but the final pose or movement just feels stiff, lacking that expressive quality you’re aiming for. It’s a common bottleneck that can hold back even the most dedicated artists.
💡 3Dcgcreator’s Essential Rigging Secrets for Cel-Shading
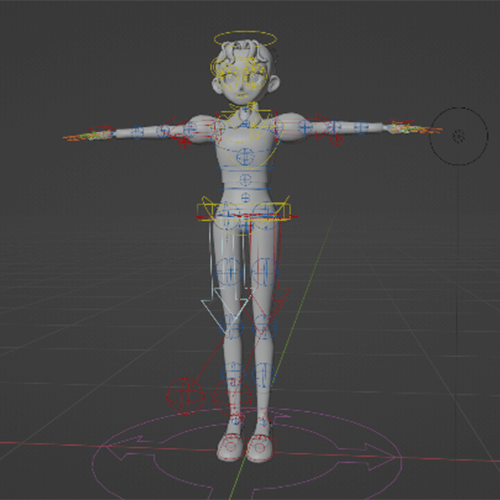
1. Armature Fundamentals: The Backbone of Expressive Motion
The core of any good rig is the Armature, which is essentially a skeleton made of Bones. Understanding how these bones connect and inherit properties is crucial.
- Edit Mode vs. Pose Mode: This is where most beginners get tripped up.
- Edit Mode is for defining the Rest Pose – the default, un-animated state of your character. Any changes here affect the fundamental structure.
- Pose Mode is for animation. Changes made here don’t alter the Rest Pose; they are purely for posing and animating. If you mess up in Pose Mode,
Alt+G,Alt+R, andAlt+Swill reset the bone’s transformation (location, rotation, scale) back to the Rest Pose.
- Bone Hierarchy and Parenting: Use
Ctrl+Pto parent bones. The “Connect” option links the head of the child bone to the tail of the parent. “Keep Offset” maintains the relative position without a direct connection, useful for complex rigs. Always check the ‘Bone Properties’ > ‘Relations’ to verify parent-child links. - Bone Layers: With 32 layers available in the Armature properties, organize your bones logically. For instance, controller bones might go on one layer, deformation bones on another. Use the
Mshortcut to move bones between layers, keeping your viewport clean and focused.
2. IK vs. FK: Choosing the Right Movement Language
Understanding Inverse Kinematics (IK) and Forward Kinematics (FK) is key to efficient animation.
- Forward Kinematics (FK): Think of it like a chain. Moving one bone affects all subsequent bones. It’s great for fine-tuning specific joint movements and achieving precise control, like the subtle twitch of a finger.
- Inverse Kinematics (IK): This is more intuitive for character movement. You move an “end effector” (like a hand or foot controller), and the system calculates the necessary positions and rotations of the parent bones. This is fantastic for posing limbs naturally and quickly.
- The Pole Target: IK setups often use a “pole target” Bone to control the direction of the bend (e.g., ensuring a knee bends forward). This controller can be customized with shapes for easy selection and manipulation.
- Hybrid Rigs: Many professional rigs offer the ability to switch between IK and FK for limbs. This is a game-changer, allowing you to use FK for precise animation segments and IK for broader, more natural motion. Mastering when to use which can drastically speed up your workflow.
3. The Art of Deformation: Skinning and Weight Painting
This is where your rig truly comes alive. Skinning is the process of binding your 3D mesh to the armature so it deforms correctly.
- Deformation Bones vs. Controller Bones: Not all bones are meant to deform the mesh. Controller bones are for animation manipulation, while deformation bones directly influence the mesh. In the ‘Bone Properties’, ensure ‘Deform’ is checked ONLY for bones that directly affect the mesh. This prevents unintended weight assignments and keeps your rig clean.
- Automatic Weights — A Starting Point: When parenting the mesh to the armature (
Ctrl+P> “With Automatic Weights”), Blender assigns weights based on proximity. This is a great starting point, but rarely perfect. - Weight Painting Mastery: This is where pros shine. Switch to Weight Paint mode. Red indicates full influence, blue indicates no influence. By painting weights, you can precisely control how much each vertex of your mesh is affected by each deformation bone. If automatic weights are off, manually setting weights from 1 (full influence) allows for more precise control than trying to correct automated errors.
🛠️ Key Skills & Details That Define Professional Quality
To achieve that professional, hand-drawn cel-shaded look, it’s not just about the tools but the approach.
- Strategic Rig Organization: Using collections in the Outliner to separate your model, rig (Armature), and controllers is non-negotiable. This allows for cleaner scene management, especially when dealing with complex characters.
- Viewport Visibility Hacks: The ‘Viewport Display’ > ‘In Front’ option for Armatures is a lifesaver. It ensures your bones are always visible, no matter the camera angle or mesh overlap, making editing much smoother.
- Scale Management is Crucial: For Rigify, especially, the Armature’s scale must be 1 for the rig generation to work correctly. Always perform edits in Edit Mode and if you scale the Armature object in Object Mode, immediately apply the scale with
Ctrl+A> ‘Scale’. Failure to do so can lead to errors during rig generation. - Bone Axis Alignment (Recalculate Roll): Twisted or misaligned bone axes (seen as colored lines) are a common source of errors, especially with Rigify. After setting up your bone hierarchy, use
Shift+N> ‘Global -Y Axis’ (or the appropriate axis for your project) to recalculate the bone roll and untangle the Z-axis. This ensures IK constraints and deformations behave as expected. - Selective Rig Generation: Rigify offers a lot of automated rigs. Don’t be afraid to delete meta-rig bones for parts you won’t animate (like fingers or complex facial rigs if you only need eye movement). Understanding ‘Rig Type’ is key here, but even simple deletion based on necessity streamlines the process.
💬 Frequently Asked Questions
Q. 3 Dcgcreator, how can I make my character’s hands look more natural when posing them with IK?
The natural look often comes from the IK setup and the pole target. Ensure your pole target bone is positioned correctly to guide the bend. For hands, consider if FK might offer more direct control for subtle finger articulation, or if a carefully constrained IK setup is sufficient for the overall limb motion. Experimenting with the IK chain length and pole target settings in the ‘Inverse Kinematics’ constraint is crucial.
Q. 3 Dcgcreator, I applied ‘Automatic Weights’ but the deformation is still weird. What’s the next step?
Automatic weights are just a starting point. The key is Weight Painting. Switch to Weight Paint mode and carefully paint the influence of each deformation bone onto the mesh. Red means full influence, blue means no influence. Use smooth brushes and focus on areas where the deformation looks unnatural, like joints or complex curves. Sometimes, manually creating an empty vertex group and painting weights from scratch offers more control than correcting automatic weights.
Q. 3 Dcgcreator, When using Rigify, I encounter errors during the ‘Generate Rig’ step. What could be wrong?
Common errors stem from incorrect bone hierarchy or scale issues. First, ensure the Armature object’s scale is 1. Apply it with Ctrl+A in Object Mode if it’s not. Second, check that connected bones in the meta-rig are properly aligned – the tail of one bone should precisely meet the head of the next, and their axes should be correctly oriented. Use Shift+N to recalculate the bone roll if axes are twisted. Also, ensure you haven’t accidentally deleted essential bones required for the chosen rig type.
👉 Want to Go Deeper?
To truly master the art of creating dynamic, hand-drawn-style 3D animation, dive into the full curriculum. Explore advanced techniques and refine your workflow with expert guidance.