💡 Three Pillars of Stunning 3D Character Creation
1. The Anatomy-Aesthetic Balance: Finding the Sweet Spot
This isn’t just about replicating human form; it’s about understanding the underlying structure and then layering artistic interpretation. The key is to harmonize anatomical accuracy with elements that enhance beauty without distorting the natural proportions. Think of it as knowing the rules of anatomy so well you can bend them artistically for maximum impact. Focus on identifying awkward spots and refining them based on both anatomical reference and aesthetic goals.
2. Workflow Efficiency: From Base Mesh to Beauty
Creating a high-quality character involves a series of interconnected steps. A streamlined workflow is crucial for maintaining consistency and saving time. This involves smart planning from the base mesh stage, understanding how retopology impacts detail, and efficient UV unwrapping. For example, considering how your costume will interact with the body mesh early on can prevent major rework later.
3. The ‘Realer Than Real’ Finishing Touches: Hair, Skin, and Lighting
These elements often make or break a character’s final presentation. For hair, it’s about finding a pipeline that balances complexity with manageability, ensuring it frames the face effectively. High-quality skin texturing requires attention to mapping details and nuanced makeup application. Finally, strategic lighting is essential to bring out the sculpted forms and textures, making the character pop.
🛠️ Key Skills & Details That Define Professional Quality
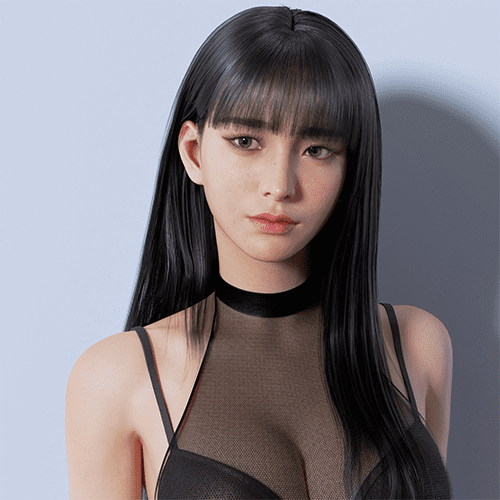
Mastering 3D character creation involves a deep dive into practical techniques. When building a base mesh, it’s vital to consider the character’s concept and find that crucial intersection between anatomical correctness and visual appeal. This means paying close attention to form and proportion, often by overlaying anatomical references onto your model and making subtle adjustments.
For costume production, tools like Marvelous Designer are invaluable for creating realistic drapery and fit. However, the real skill lies in ensuring these high-polygon models integrate seamlessly with the character’s body mesh. This requires careful consideration of proportions and how the fabric will naturally fall and crease.
Retopology in software like 3ds Max demands attention to detail to ensure clean edge flow and efficient polygon count, which directly impacts texturing and deformation. Proper UV unfolding and placement are critical for applying textures accurately, especially for intricate areas like the face and body.
High-quality skin texturing goes beyond simply applying color. It involves understanding subsurface scattering, creating believable pores and imperfections, and incorporating essential makeup expressions that define the character’s personality. The goal is to achieve a skin surface that feels alive.
Finally, hair creation often consumes a significant portion of a character’s visual real estate. Developing an optimized hair workflow, honed through trial and error, allows for easier yet stylish expression, ensuring the hair complements the character’s overall design.
💬 Frequently Asked Questions
Q. As a 3D Character Artist, how can I improve my character’s facial expressions beyond basic sculpting?
A. The key is to deeply understand the anatomical underpinnings of facial movement. Focus on how muscles interact and how that affects the skin’s surface. Referencing subtle shifts in eyebrows, eye corners, and mouth lines from real-life actors or detailed anatomical diagrams can help. Additionally, experiment with polypaint to visualize bone structures and muscle groups directly on your sculpt, which aids in achieving more nuanced and believable expressions.
Q. What’s the most efficient way for a 3D Character Artist to handle costume creation for complex garments?
A. Start with Marvelous Designer for initial cloth simulation and form. Then, import into ZBrush for detailing and refinement. Critically, ensure the high-polygon costume mesh is created with the base character mesh’s proportions in mind from the outset. This forward-thinking approach minimizes adjustments needed during retopology and UV mapping, saving significant time in the pipeline.
Q. How can a 3D Character Artist make their character’s eyes look more realistic and engaging?
A. Realistic eyes involve more than just a sphere with a texture. Pay attention to the subtle details: the meniscus at the lower eyelid, the slight wetness, and the correct placement of the cornea and iris. Adding small geometry for the tear duct and a subtle bump map for the cornea can add significant realism. Furthermore, consider how light will interact with the eye surface – reflections and refractions are key to making them look alive.
👉 Want to Go Deeper?
<