💡 Ossam’s 3 Pillars for Natural Anatomy Drawing
Illustrator Ossam’s approach breaks down the complexity into actionable steps. Here’s how to elevate your anatomical drawings:
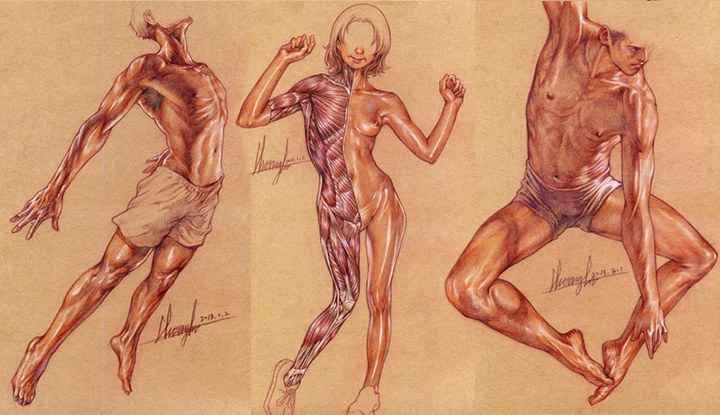
1. Visualize Structure Beyond Static Labels
It’s not just about memorizing muscle names like ‘pectoralis major’ or ‘deltoid’. Ossam emphasizes understanding how these muscles shape the external silhouette and influence movement. The key is to link the underlying bone structure to the visible form. Think about the rib cage as a foundational unit, and then build the surrounding muscles and their connections, paying close attention to how they wrap around the bones. This layered understanding is crucial for avoiding the “flat” look in your drawings.
2. Embrace Dynamic Silhouette Practice
Instead of just copying static poses, focus on capturing the essence of movement. Ossam’s method involves breaking down poses into their core silhouettes, then applying variations in strength, direction, and joint tilt. This means practicing drawing the same basic pose from multiple angles, exaggerating certain lines to show the tension or relaxation of muscles. This exercise helps you internalize the principles of foreshortening and how anatomy changes with action, making your figures feel alive.
3. Master the ‘Muscle Flow’ with Shape Language
Ossam’s unique routine involves using simple, overarching shapes to represent muscle groups before detailing. For instance, think of the bicep as a cylinder or the thigh muscles as combined wedge shapes. This isn’t about oversimplification; it’s about building a solid foundation. By understanding the primary forms that muscles take in different poses, you can more accurately represent their volume and how they interact. Sketching over provided skeletal guides, as suggested in the course materials, is a fantastic way to internalize this.
🛠️ Key Skills & Details That Define Professional Quality
Professional illustrators don’t just know anatomy; they understand it in a way that directly impacts their drawing process. Ossam highlights several key areas:
- Connecting the Dots: Truly grasp how muscles attach to bones and how this relationship dictates movement. For example, understanding the origin and insertion points of major muscles in the arm helps you draw the subtle shifts in form when the elbow bends or the wrist rotates.
- Silhouette as Storytelling: Every pose tells a story. By focusing on the external silhouette, you can convey the character’s action and emotion. Practice drawing the subtle curves and bulges that indicate muscle engagement or relaxation. For instance, a subtle shift in the shoulder silhouette can communicate a character bracing for impact.
- Applying Photo References Intelligently: Don’t just trace photos. Ossam advocates for analyzing photo references by identifying the underlying bone structure and key muscle masses. Reverse-engineering the pose based on light and shadow helps you understand the anatomy that creates those visual cues. This practice is vital for developing your own interpretative drawing skills.
- Joint Mechanics in Motion: Anatomy isn’t static. Understanding how joints articulate – their range of motion, typical tilts, and the resultant muscle stretch or compression – is critical. Practicing drawing the same joint from various angles, showing extreme poses, will build muscle memory for dynamic figure drawing.
💬 Frequently Asked Questions
Q. Illustrator Ossam, how can I best utilize the example files provided in the course?
Illustrator Ossam recommends focusing on specific areas needing improvement rather than strictly following the course chronologically. For beginners, a structured approach of [Understanding Bones and Muscles -> Muscle Drawing Practice -> Photo Data Analysis] for each body part is advised. Intermediate artists can revisit advanced techniques to address personal weaknesses. Sketching over the provided skeletal guides is also highly beneficial for internalizing the anatomical structures.
Q. Illustrator Ossam, what makes your approach to teaching anatomy different from other resources?
Illustrator Ossam emphasizes understanding the visual impact of anatomy on the external silhouette and movement, rather than just rote memorization of terminology. They connect bone structure, muscle function, and external form through practical exercises, shape language, and real-world application analysis, making the learning process more intuitive and directly applicable to illustration.
Q. Illustrator Ossam, is there a recommended sequence for studying the course material?
Illustrator Ossam suggests a flexible approach. While a chronological path is available, it’s highly effective to target specific areas you find challenging. Beginners might follow the [Understand -> Draw -> Analyze] routine for each body region. Advanced learners can benefit from revisiting specific techniques to refine their skills and fill knowledge gaps.